Showing posts with label project management. Show all posts

Monday, October 16, 2017

The Hidden Secret to an Effective Work Planner

I work to live. 

Oh, I actually enjoy being at the office. You can't deny that all those office supplies make you giddy, too, or you wouldn't be reading this. But none of us go to work solely for the coffee or the office supplies, even if we like our jobs.

We go to work to afford trips to Europe, cute shoes, and nights out at fancy restaurants. Or, if you are more like me, to afford electricity, water, and a roof of some sort. Maybe, if you are lucky and determined, you'll make enough to put a new handbag or planner on your birthday list.

Work is an important part of life and takes up a lot of time, so keeping work pleasant and NOT overwhelming is an important goal.

I'm going to suggest one important tweak to your work planner (that also works for home) to change how you think about productivity planning...


planner, planners, productivity, productivity at work, work planner


Sunday, November 13, 2016

How to Use a Personal Planner for Work and Project Management

I've been blogging about how to use a planner a lot less lately because I've been working at my big girl job a lot more often.


planner, paper, projects


Monday, August 29, 2016

How to Use a Planner to Survive the Chaos of a Natural Disaster

If you aren't familiar with this blog, I mostly write about day planners. In fact, Giftie Etcetera has a pretty active Facebook group where we discuss getting and keeping our lives in order. 

When my hometown in Louisiana flooded in a massive, 3-day rainstorm, the group kept talking about planners and order in general. 


That is, they did until one member said that her house flooded and she was stuck. Her planner wasn't good enough for the to-do list that grows so long and massive after your home is completely ruined. 


Louisiana Flood, Louisiana Flood 2016, survival, planner, plan for survival


Friday, May 13, 2016

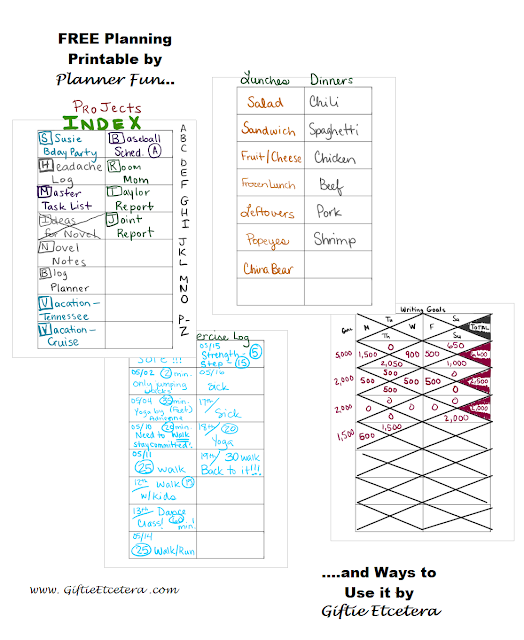
4 Uses for a Free Box Printable from Planner Fun

Becky at Planner Fun teams up with Giftie Etcetera every month to offer a free printable, with a ton of new ways to use it.

This week, we are using her cool page full of boxes. So versatile. So simple. So useful.

Make sure to visit Becky's blog (link at the end of this post)! She's awesome and most of her printables are free.


free printable, planner page, planner printable


Saturday, December 26, 2015

Top Ten Planner Posts of the Year: Post # 6

If you don't read any other post that I ever write, read the one that is in position #6 of my Top Ten Planner posts of the year. 

And read it BEFORE you set up your planner for the new year!

It's my favorite post, even if it's not the most viral.


Throughout the rest of the year, I'll add to the countdown.


planner, project, project management


Monday, September 7, 2015

My Project Is Finished...Now What?

***This post may contain affiliate links. See my "Disclaimer" link for additional details.***

Whether your project is a craft, a term paper, a work event, or a birthday party, there is a feeling of relief when it is done.

After all, you use a planner at least partly for the satisfaction of checking off tasks, right?

But is it really done? Have you completed everything necessary to move on?


planner, file, projects


Friday, August 14, 2015

How to Carry Paperwork in Your Planner

***This post may contain affiliate links. These links help you find the items that I use in my planner and financially support this blog. See my "Disclaimer" link for additional details.***

Paperwork.

It's a reality that is unavoidable. I deal with most of it by processing paperwork immediately: toss, file, process, or hold.

*Toss - Trash gets tossed.

*File - Filing goes in my filing container.

*Process - Invitations get an immediate RSVP, a task to buy and wrap a gift, and a note on my calendar of the time and place. Then, they are tossed.

*Hold - A coupon gets the deadline noted in my planner and the coupon goes in the front pocket of my planner. A homework assignment gets written in my planner and the instructions go in the Hold box until assignment is complete.

But, sometimes, there is something that needs processing, but I just cannot deal with it right that second. Or my hold box is not appropriate because I'll be doing the task outside of my house.

If I crammed all of that stuff into my Franklin Covey compact planner, it would be bursting at the seams.


planner, accessories, envelope, filing, ring bound


Monday, August 10, 2015

How to Plan the First Day of School

***This post may contain affiliate links. These links help you find the items that I use in my planner and financially support this blog. See my "Disclaimer" link for additional details.***

This is a back-to-school post, but at its heart, this is really a post about using a planner to complete any project.

Back-to-school is just what is weighing on my mind today as my kiddos leave for their first days of 2nd and 4th grade.

Project planning is one reason that I use a ring bound planner instead of a spiral or bound planner. I can have separate pages that let me brainstorm, think about, and organize what needs doing, before scheduling it on my calendar and task lists. If you do use a bound planner, a notebook for projects is essential!

When something needs to happen (usually by a certain date) that requires complex planning, such as several tasks, multiple deadlines, overseeing several people, or anything else that makes only using a calendar or a task list less than feasible, I plan a project.


project planning, productivity, paper planner, back-to-school


I made a new index for project planning this week, as seen in the picture below.

Friday, June 26, 2015

Tricks for Planning Projects

Someone in the Giftie Etcetera Facebook group asked for tips to plan projects. As Loyal Readers know, I use a Project index for planning projects. But the question raised was more about how I actually plan each project.

I decided to start with a simple tutorial identifying the main parts of most of my project pages. I did this using OneNote, but I do it in my planner the exact same way!


project, projects, project planning, planner, onenote

Tricks for planning projects:

*LABEL


I label the project topic (the same one as listed in my project index) in a box (so it is easy to spot) in the upper right hand corner of the page.

Under the box, I put a subtopic. A blog post, as in the example, is a one page project, but for multiple pages, this is really important. For example, for a birthday party, I might have a page for menu and another for the guest list. For a research project for work, I might have an outline page, a research notes page, and a list of tasks.

Next, I put in the date when I create the page (and, sometimes, the due date right under that: "DUE: 06/29/15").

*TWO COLUMNS

I make two (usually imaginary) columns on each page by indenting the first words that I write slightly to the right.

The first column (left) contains due dates, appointments, and tasks. If the information to the right is not something that needs to be noted in the meat of my planner (my monthly and weekly calendars), the left column stays blank. That creates a simple task list to the left.

The second column (right) contains the information that I need. In the photo above, I write tasks, ideas, outlines, and lists.

*HIGHLIGHTED SCHEDULED


Once something is written in my planner from the left column, I highlight it to show that it is scheduled.

Note: In this case, I am not highlighting that the task is done, but that it is either written on my monthly calendar (appointments and really important due dates) or on my weekly task list. If you skip this step, you might not get things done on time, so make sure you do this one!

*SHAPES

Boxes, clouds, and doodles help me to keep like information together and visually easy to spot.

In OneNote, I can just use the "Lasso Select" function to move things around and use the "Add Space" function to add items to these lists.

In my planner, I use erasable Frixion pens to add things to the lists or move them.

I really just keep my writing pretty organic, reflecting my thinking processes, but labeling, making two columns, highlighting scheduled items, and using shapes helps make my project easy-to-read and accomplish.

Etcetera.


Linked at:

Kenarry: Ideas for the Home

Saturday, March 28, 2015

Tech Trick: Printing to OneNote 2013

Surface Pro 3 owners know that they can double-click on the Surface Pen to capture a screen shot in OneNote 2013 (a free download for anyone, not just Surface users).

But I've discovered printing to OneNote, and that has changed my life. The best part of this discovery is that, since it is OneNote functionality and not Surface functionality, it works for ANYONE with a computer and OneNote, not just Surface Pro 3 users!

Now, when I do research in Google, I can download entire documents, pdfs, or websites to OneNote and highlight or notate them there. I can also dock the downloaded documents to my desktop and work with notes along side of whatever else I am working on, like a Word or Excel document or a blog post.

One cool thing about OneNote is that you can print anything that can be printed to a printer to OneNote instead.

Print to OneNote:


technology, Surface Pro 3, OneNote, print


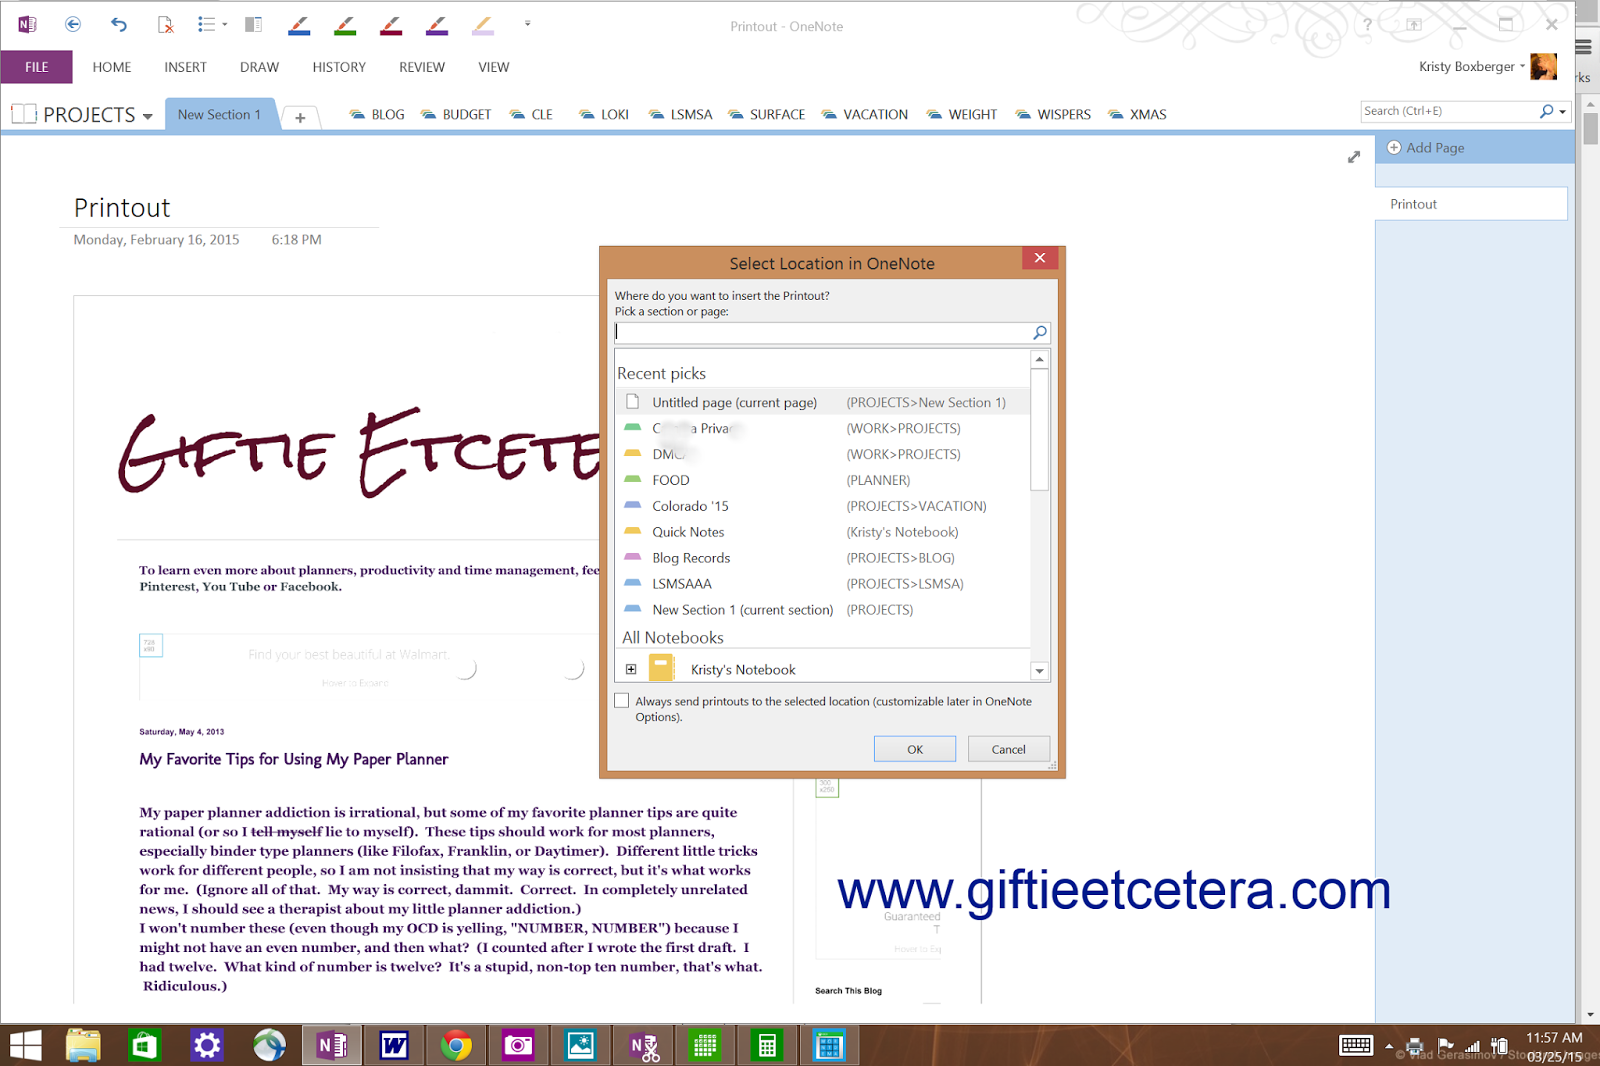
1. Select print just as you normally would. On a Surface Pro 3, that means a right-click on the screen & select "print." (Or, in something like Word, select "File" >>> "Print.")

2. Select "change" >>> set "Print to OneNote" or "OneNote" as the destination.

3. Select "Print."

One Note will then pop up a screen allowing you to choose the OneNote Notebook where you want the document to print.


technology tips, writing

4. Once you choose the destination, press ok.

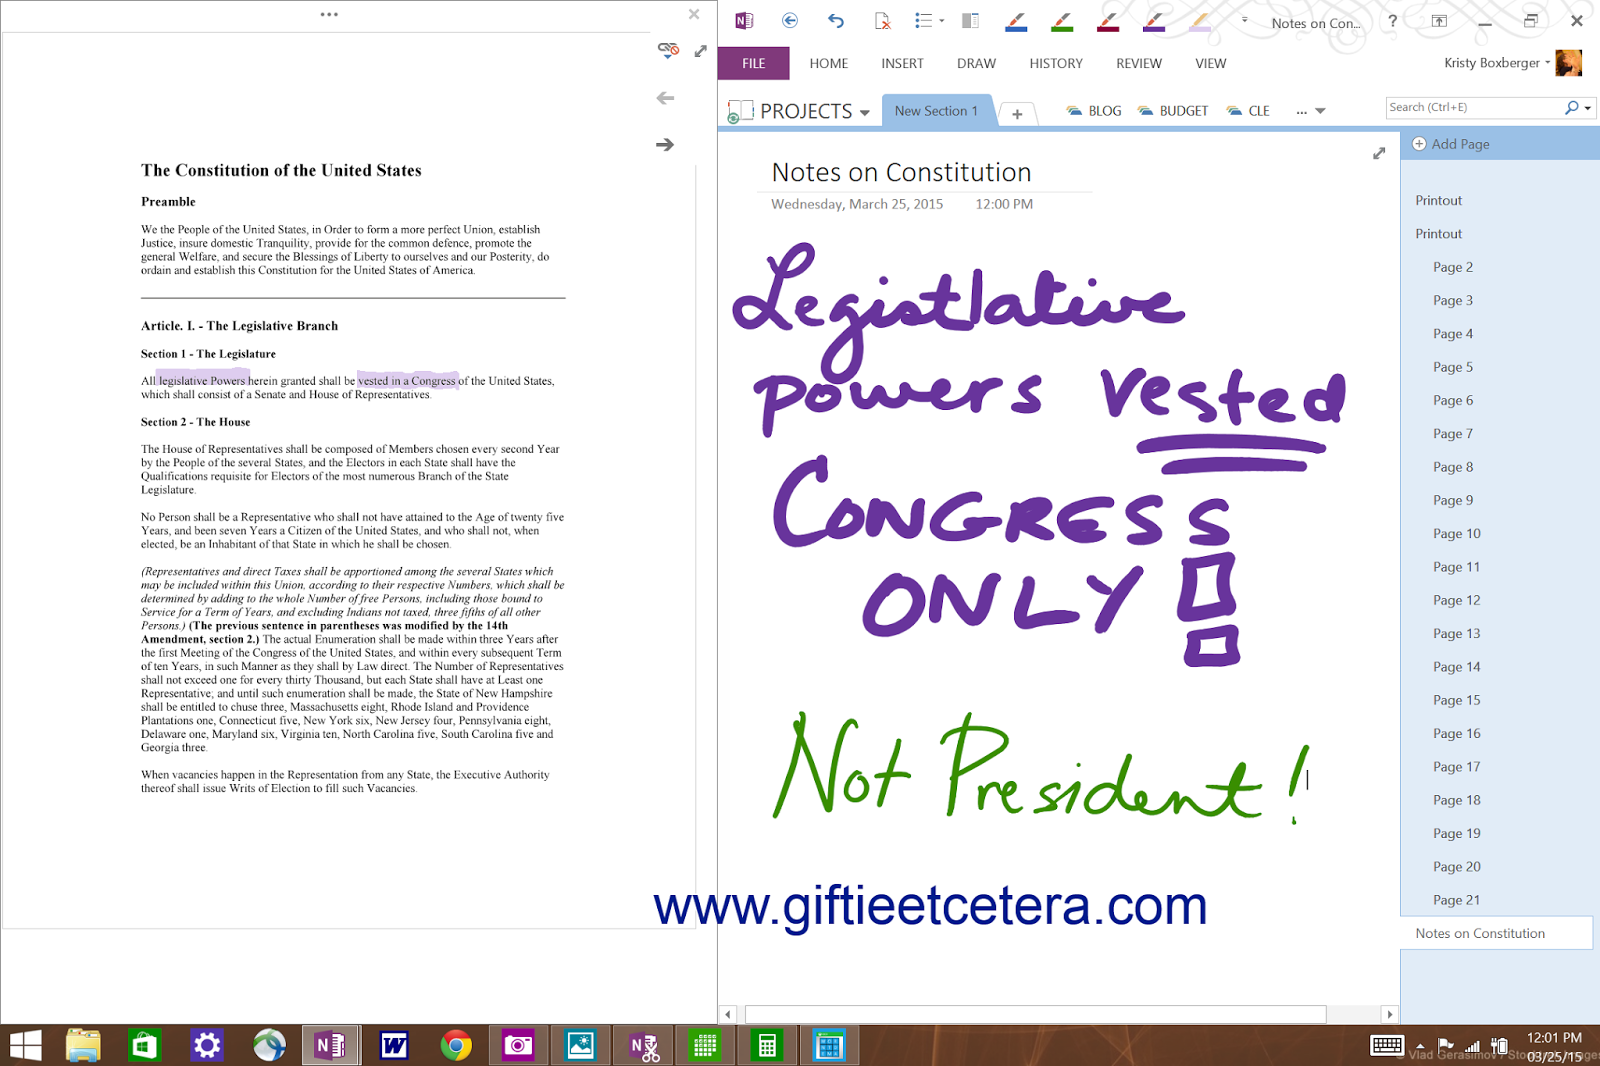
The document is now printed to OneNote!

Another cool feature of OneNote is that you can now Dock to Desktop (click here for instructions) anything that you printed. That way, you can view the printed document and your own work together (examples of your own work include a Word document, a blog draft in Chrome, or many other things, including just another OneNote page).

oneNote 2013

Note that a very long document will be shown as multiple pages. You can rename any or all of the pages. I tend to only rename the first page.

Documents in OneNote are completely searchable and can be copied and pasted.

Using this feature means I can do all of my legal research by printing Westlaw cases to OneNote. It means I can research blogs and write them while looking at the research. I am loving this feature.

Visit on Saturdays for more technology tips!


Etcetera.

Wednesday, October 9, 2013

Upscale Planning: Rising Above A Mere Calendar With Projects And Notes

***This post may contain affiliate links. See my "Disclaimer" link for additional details.***

Buckle up, Plannerds! This is an unusually long blog entry, but I promise it will be worth it.


planner, projects, project management, project management in a planner

UPDATE: Since posting this post, I've also done a video about Project Planning in a Planner. Watch it here.

Today, I bought a new purse. (See, I told you! You are already smiling.) 


I have a very nice, neutral cognac-colored handbag and a bright, fun purple purse

What I needed to round out my wardrobe was an inexpensive, but classy, mid-sized gray purse. It needed to be big enough for my planner, inhaler, keys, wallet, and phone, but small enough to tuck under my legs at a restaurant. 

So I purchased this gray beauty (no longer available):


gray, purse, planner

Having three purses might seem like too many for One Purse People. 


(One Purse People are strange sorts, and I cannot suggest that you hang out with them. Surely, they are unstable. What's next? One shoe?) 

And having ONLY three purses might seem like too much to build a wardrobe around for most ladies.

({Jedi mind trick hand swipe} - Look away. Ignore the hamper of other purses in my closet. Those do not exist.)

But the reality is that, for most of us, we do need a few bags for different reasons. 


It rounds out our closets and makes us look professional, put together, and a little more upscale. On the other hand, a purse for every single outfit is an organizational nightmare. So three active purses is my compromise.

Using a planner to its maximum potential can also upscale our lives.

A planner is not merely a calendar. 


It is a personal assistant, who works for and with you, to make your life easier. A good planner leaves you looking successful and polished. A fabulous planner goes beyond the calendar and the task list and becomes a tool that pulls your life together.

So, without further ado, how to upscale your planner in two easy steps:

1. Add a Projects section.
2. Add a Notes/File section.

Ta da! Upscale and classy.

Oh, right. You probably want to see how I create these sections so that they are easy to use and actually useful, right? 


Okay, here goes. It SOUNDS intense. It's not. I solemnly swear that creating these sections is a simple, quick process that will free you up to actually get your stuff done.

Step 1Consider which sections you can consolidate in your planner


I personally have only a few sections.

*My dashboard, which is the first page and only blank, lined paper:


blank paper, planner

*Projects (which we will explore today):


projects, planner tabs, planners, blue planner

*Monthly and Weekly (the meat of the planner, including all appointments, task lists, and future planning page for dates falling beyond this year's calendar inserts)

*Notes/Files (which we will also explore today)


pink planner tab, planner

*Supplies


Planner supplies

Step 2Gather supplies - blank paper, small post-it flags, and an ink pen or two


Notice that I take the post-it flags out of their packages, so they take up very little space to store in my planner.

UPDATE: I now use bigger post-it labels for my Projects and Notes sections. Consider getting these Post-It tabs, as they work really well and look nicer.


post-it flags

Step 3Pull out anything in your planner that does not belong in the calendar part and decide if it is a Project (ongoing) or a Note/Files (you need to have it with you, but only as a reference)


I interchange the terms Note and Files, as both sort of make sense to me. 

UPDATE: I now only use the term "Notes." Files refer to my at-home file cabinet instead.

Fortunately, I had already started a list of Projects and Files, though in a very messy way. 

Almost everything either belongs in the main part of your planner, is a project (several steps, currently active, and ongoing), or something to be filed away (either in your planner or elsewhere).


pages, paper, tabs, projects, index


TIP: If something is not either a Project or something you might need to reference away from home, perhaps it needs to be discarded or filed in your files at home. 

Today, for me, that meant filing away the records of a medical insurance claim (now that the bills have been paid and the claim accepted by our insurance) and tossing my notes of food intake (now that I am tracking calories on-line instead).

Step 4Write the letters A-Z along the right outside edge of a blank sheet of planner paper


(I added pink. You don't have to.)


abc, file section


planner, paper, keyboard


Step 5Make indexes for Projects and Notes/Files, respectively

I make a very simple list, in no particular order. I just add things as I think of them, and cross them out (and remove and file or toss the accompanying papers) when they become irrelevant.


abc order

TIP: I number projects just so that I can make sure that I don't have too many at one time. I don't number files.


TIP: If you deal with several vendors or clients, those might be some of your "projects" (active) or "notes/files" (inactive). If you have enough clients, add a section to your planner for clients, but use this indexing system.

A sneak peek at the ultimate goal (including my personal favorite "projects" - Nanowrimo, tracking my current medical conditions that are in flux right now, tracking my kids' allowance, Christmas planning, and home room mom planning):


project section, projects section


Step 6Make a label on a post-it flag for each item and match up the label to the ABC order area on the notepaper itself. Then, put the projects in the same order as the index list (which means your latest project always gets added to the end of the Projects section.

Note that it's important that you not just list your files in ABC order, or the labels will hide each other. 

By literally putting the project or file name on the index AS IT OCCURS to you and putting the newest labeled section last in the Projects section, you keep the labels mixed up (though still in ABC order) and easier to access.


project


Projects


Boy routine, kids routines

The final result makes it really easy to find whatever Project you are working on or important information in your Notes/Files:


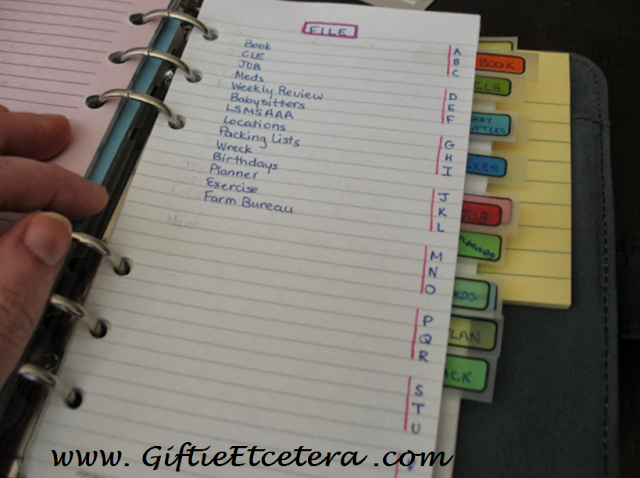
ABC Planner Files


Some Notes that I have that you might consider carrying with you include:

*a list of current medications, 


*your weekly review routine (and any other routine that you just need to refer to), 

*a list of service providers (A/C repair, babysitters, etc.), 

*a locations page (tells where the swimsuits hide during the winter and where the turkey tray is stored come November),

*packing lists (just use old ones to make new ones),

*birthday party planning lists (again, use old ones to make new ones), and

*insurance information (in case of wrecks, disasters, or hospitalizations).

Having a working Projects section and a good handle on your notes and files will work miracles in your life. 


Try upscaling your planner and let me know what works for you!

For more insight into my project planning process, make sure to watch my You Tube video on project planning.

Etcetera.